Element UI 的表格算是非常常用的模組化套件之一,不過其表格邊框樣試算是非常難以處理的。這邊筆記一下如何客製化的一些步驟(頓時覺得辦公室文書軟體要自定義樣式簡單多了)。
需求
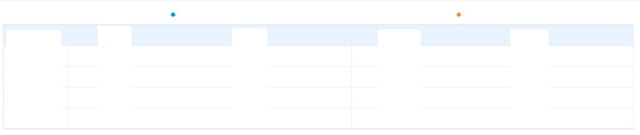
這回的樣式需求如下:
1. 表格(Table)的表頭(Header),不要有框線且最左上角的欄位要空白。
2. 表頭的每一個項目要置中,且文字前面要附上圖示。
3. 資料欄位中,除了項目以外,每個欄位內要塞入兩個值,且保持適當間距
程式碼
|
1 2 3 4 5 6 7 8 9 10 11 12 13 14 15 16 17 18 19 20 21 22 23 24 25 26 27 28 29 30 31 32 33 34 35 36 37 38 39 40 41 42 43 44 45 46 47 48 49 50 51 52 53 54 55 56 57 58 |
// el-table 的基本樣式,用個自定義的 class 包覆起來,以免影響其他的表格 // 以下操作是先啟用預設的 border 屬性做調整 /*控制最外層的框線部分,不包含最右端*/ .el-table--border{ border:none; } /*最外層的右端框線&控制每一欄位的表頭右端框線*/ .el-table--border::after, .el-table--group::after{ background-color: #fff; //假設你的背景色是白色的話,就可以達到隱藏效果 } /*.el-table 本身分為 .el-table__header-wrapper & .el-table__body-wrapper*/ /*在第一個 th 設定顏色為白色來隱藏,在其他的對應位置用 :before 效果來增加圖示*/ .el-table__header-wrapper{ .el-table__header{ thead{ tr{ th{ border-left: none; // header 左邊框線隱藏 border-right:rgba(255, 255, 255,0.5); // header 右邊框線顏色為白色 div:before{ content:''; display:inline-block; vertical-align: middle; width:10px; height:10px; border-radius: 50%; margin-right:5px; } } th:nth-child(1) div{ color:#FFFFFF } th:nth-child(2) div:before{ background-color: #2DA1EE; } th:nth-child(3) div:before{ background-color: #F99925; } } } } } /*tbody部份上框線顏色,為了要讓全部顏色都可以顯示,要將 border 線條粗細大於 1px*/ //每個表格內用一層100% <div>包覆兩層小的 50% <div>。設置 display:flex 和 margin屬性來控制。 .el-table__body-wrapper{ border:2px solid #EBEEF5; .tdInside{ display: flex; justify-content: space-between; div{ width:50%; margin-left: 10%; } } } |